PyTorch Integration
The following documentl provides information on 2 ways to utilize PyTorch-based computer vision models inside of the SWARM Developer System. These features are only available on PyTorch enabled versions of the Platform, which must be specifically requested when deciding to utilize a specific container format.
Supported Features
Below are the current features and versions of PyTorch that we support:
- Supported PyTorch Versions: 2.0.0
- Custom PyTorch Neural Networks
- PyTorch-based Neural Networks from TorchHub
Video Demonstration
Custom PyTorch Neural Networks
Getting Started
To utilize a Custom DNN, you will need to complete the following steps:
Step 1: Add your model to the client
All models that need to be uploaded to the system should be placed in the models folder of the SWARM Developer Client. Each model should have a sub-folder, labelled with a name of the model to be implemented. This is would look like: models/SSD for a model that is called "SSD".
Ensure that you have your trained network weights in a folder called "weights". See the example below.
Note!
Please be aware that the way we import multi-file systems is unique, which requires that any import statements
in your set of files that implements a model must be immediately cross importable. In english, this means that
you need to ensure that all import statements are relative to the main class file.
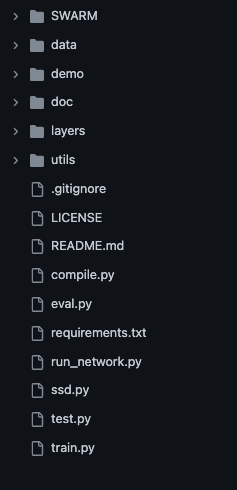
The following example will demonstrate this. Below is the file structure for a "Single Shot Detector (SSD)" Network
that detects and classifies objects in an image.

As can be seen from above, we have a single file called ssd.py, which defines the PyTorch-based Neural Network
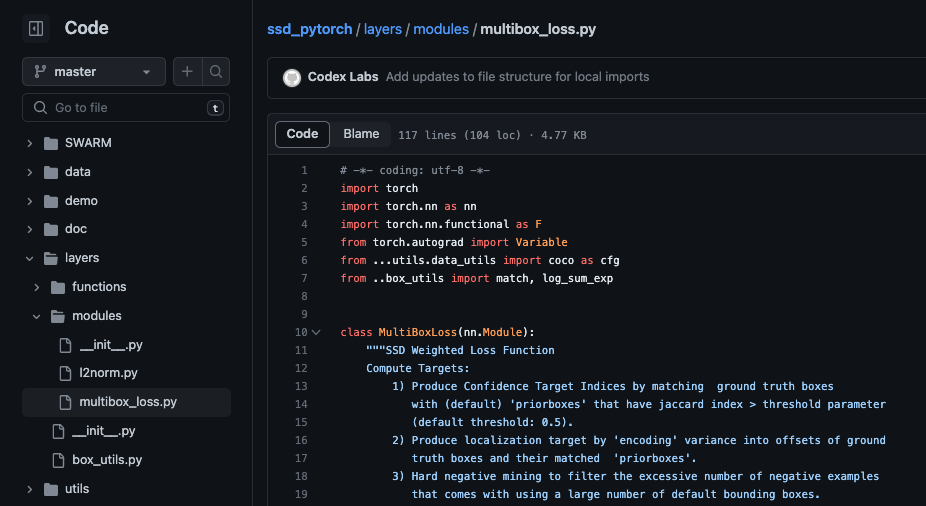
as a Python class. Inside of this file are imports to the layers and utils folders. Below is an example of the import
statements from that file.

What is important to note is how the "utils" folder is imported. If I put ".utils.data_utils", this means to reference
that the folder "utils" is in the same directory as the file being loaded. If I put "..utils.data_utils", the this means
the folder "utils" would be in a directory one higher then the current directory. This is critical to determine before
actioning your model, as import errors will prevent the perception node from working properly.
Step 2: Build a Wrapper for your Model
In general, you need to provide wrappers for machine learning models to integrate into any framework. We have attempted to build a wrapper system that is simple and easy to use. In the file titled "DetectNetWrapper.py", you can find an example of a wrapper for a network called "DetectNet".
This wrapper class has the following structure, which is required:
# =============================================================================
# Copyright 2022-2023. Codex Laboratories LLC. All rights reserved.
#
# Created By: Tyler Fedrizzi
# Created On: 3 April 2023
#
#
# Description: Utilities to run with PyTorch tools
# =============================================================================
try:
from torch import Tensor
except ModuleNotFoundError:
print("Please install PyTorch Version 2.0 or greater")

from pandas import DataFrame


class TorchModelBase():
"""
Base Custom Torch module that describes the required methods that
need to be implemented by the User so that they can run their
models in the normalized setup.

# You can inherit from the class to create your Algorithm that will
# run in the SWARM System

### Arguments:
- None
"""
def __init__(self, parameters: dict, detection: bool = True, classification: bool = True) -> None:
    # This should be initalized as the Class that you wish to
    # make that describes the network. So if you created a class
    # called DetectNet, then this would be:
    # Inputing your parameters using ** allows you to set your
    # parameters as input.
    # self.network = DetectNet(**parameters)
    self.network = None
    self.detection = detection
    self.classification = classification
    self.segmentation = False  # TODO

    # Example output dataframe. Add rows using the following:
    if detection and classification:
        # xmin, ymin are the Top Left coordinates of the bounding box in pixel coordinates
        # xmax, ymax are the bottom Right coordinates of the bounding box
        # confidence is a float in the range [0.0, 1.0]
        # name is the class label
        self.required_columns = ["xmin", "ymin", "xmax", "ymax", "confidence", "name"]
    elif detection and not classification:
        self.required_columns = ["confidence", "name"]
    # Below is the fastest way to add a dataframe together
    # https://stackoverflow.com/questions/24284342/insert-a-row-to-pandas-dataframe
    #  df = pd.concat([pd.DataFrame([[1,2]], columns=df.columns), df], ignore_index=True)
    self.output_dataframe = DataFrame(columns=self.required_columns)

def preprocess_images(self, images: list, **kwargs) -> list:
    """
    Pre-process the provided images, which will always be a numpy
    array that is of dimension (Height, Width, Number of Channels).
    The goal of this method is to pre-process the image such that


    ### Inputs:
    - images [list] A list of images with Numpy

    ### Output:
    - A list of transformed images
    """
    raise NotImplementedError()

def postprocess_output(self, network_output: Tensor) -> DataFrame:
    """
    Postprocess the output tensor of the model, generating a Pandas
    DataFrame that can be passed to the Detection building module
    and provide detections to the system.

    ### Input:
    - network_output [Tensor] The output Tensor of the Model

    ### Output:
    - A Pandas DataFrame containing all required metadata as listed
        in the PyTorch documentation on the SWARM Website
    """
    raise NotImplementedError("Implement the post Processing!")
As you can see, the base model class has two methods, preprocess_images and postprocess_output.
preprocess_images
This method receives a single image from the system and allows you to process the image before it goes into the
neural network. Resizing, transformations, etc. must occur here so that the image is transformed to a tensor
and is of the proper tensor size to be transformed.
postprocess_output
This method receives the raw tensor output of the network and allows you do any type of post processing needed,
where you must return the detections (or classifications or segementations) that the network has preformed. An example
is provided below:
def postprocess_output(self, network_output: torch.Tensor) -> DataFrame:
    detections = network_output.data
    dets = list()
    scale = torch.Tensor([self.input_image_size[1], self.input_image_size[0],
                        self.input_image_size[1], self.input_image_size[0]])
    for i in range(detections.size(1)):
        j = 0
        while detections[0, i, j, 0] >= 0.6:
            score = detections[0, i, j, 0]
            label_name = self.class_names[i-1]
            pt = (detections[0, i, j, 1:]*scale).cpu().numpy()
            row = {"confidence": score.item(), "name": label_name, "xmin": pt[0], "ymin": pt[1], "xmax": pt[2], "ymax": pt[3]}
            dets.append(row)
            j += 1

    return dets
Please note that the output is transformed into a list of dictionary entries, each of which contains the metadata for the
detection. It is possible to output classifications only (score and label) or segementation (comming soon!). In general, the following
schema is required for detections:
detection = {"confidence": FLOAT, "name": STR, "xmin": INT, "ymin": INT, "xmax": INT, "ymax": INT}
Step 3: Add a Perception Node to the SWARM Platform
Next, you will need to add a TorchPerception node to each agent that is using your model.
Using the PyTorchCustomSimulationSettings.json file as example, you add the following to each agent to utilize the network:
{
    ...
    "SoftwareModules": {
        "TorchPerception": {
            "Algorithm": {
                "Level": 1,
                "States": [],
                "Parameters": {
                    "algorithm_type": "Detection",
                    "model_name": "SSDWrapper",
                    "weight_file_name": "ssd_300_VOC0712.pth",
                    "output_type": "stream",
                    "camera_name": "Camera1",
                    "model_folder_name": "SSD",
                    "model_parameters": {
                        "network_parameters": {},
                        "input_image_size": [
                            480,
                            640
                        ]
                    }
                },
                "InputArgs": [
                    "Image"
                ],
                "ClassName": "TorchCustomModel",
                "ReturnValues": [
                    "Detection"
                ]
            },
            "Parameters": {
                "Model": "SSD"
            },
            "Publishes": [
                "Detection"
            ],
            "Subscribes": [
                "AgentState",
                {
                    "Image": "Camera1"
                }
            ]
        },
    }
    ...
}
While this module may look complicated, the structure is meant to emulate a set of options that are easily configurable for you needs. To start, we are using the Algorithm called TorchCustomModel. The required inputs are listed above and available options can be found in the Algorithm's documentation: Algorithm Documentation.
An important point here is that the module has a parameter called Model. This parameter must be set to
the name of the folder that you created for your model! This is so that the system can handle the upload process
from the client to the server. In general, we use tar utilities for Unix operating systems and gzip for Windows.
The same parameter is listed again in the input parameters to the TorchCustomModel algorithm. This is because of the way
in which we import the modules into the system using the Python importlib module.
Of importance is that the TorchCustomModel algorithm takes as an input an Image and returns back a list of Detections from that image. A Detection is a SWARM-specific class that provides information about a specific object, where it was detected, the bounding box of the image and other metadata. You can learn more about the Detection class here: SWARM Classes
Another key aspect of this module is that the images are being streamed from the Camera component. This means that a Camera must be listed with the name listed in the subscription. The validator will throw an error if this condition is not met.
Step 4: Run Your Custom Model
Now, you can run your settings file like normal. The system will tar the model that you have specified, transfer it to the Server and then run the system by loading in the weights file of the saved model. For help with saving your PyTorch model, please refer to the documentation: Saving and Loading PyTorch Models.
Once the simulation has been completed, when you shut down the container, the model that was uploaded will be erased. If desired, a manual process is available to remove any files uploaded.
If you are on a local version of the system and have choosen the "stream" as output, you will see an OpenCV window pop up and will be able to see live outputs of your network. Images and video is also available. All data can be downloaded
Torch Hub Neural Networks
All integrations have been completed for all Detection models in TorchHub. Understand that some networks cannot be used due to the amount of Virtual RAM that is available on your graphics card. Furthermore, running multiple agents with multiple networks will similarily affect performance and may Significantly reduce the number of agents you can run at once.
Using the PerceptionSimulationSettings.json file as example, you add the following to each agent to utilize a network:
{
    ...
    "SoftwareModules": {
        "TorchPerception": {
            "Algorithm": {
                "Level": 1,
                "States": [],
                "Parameters": {
                    "model_type": "Detection",
                    "model_name": "yolov5s",
                    "repo_name": "ultralytics/yolov5",
                    "output_type": "stream",
                    "camera_name": "Camera1"
                },
                "InputArgs": [
                    "Image"
                ],
                "ClassName": "TorchHubModel",
                "ReturnValues": [
                    "Detection"
                ]
            },
            "Parameters": {},
            "Publishes": [
                "Detection"
            ],
            "Subscribes": [
                "AgentState",
                {
                    "Image": "Camera1"
                }
            ]
        },
        ...
    }
    ...
}
Please refere to the documentation for the TorchHubModel to learn what parameters are available. Documentation can be accessed here: Algorithm Documentation.